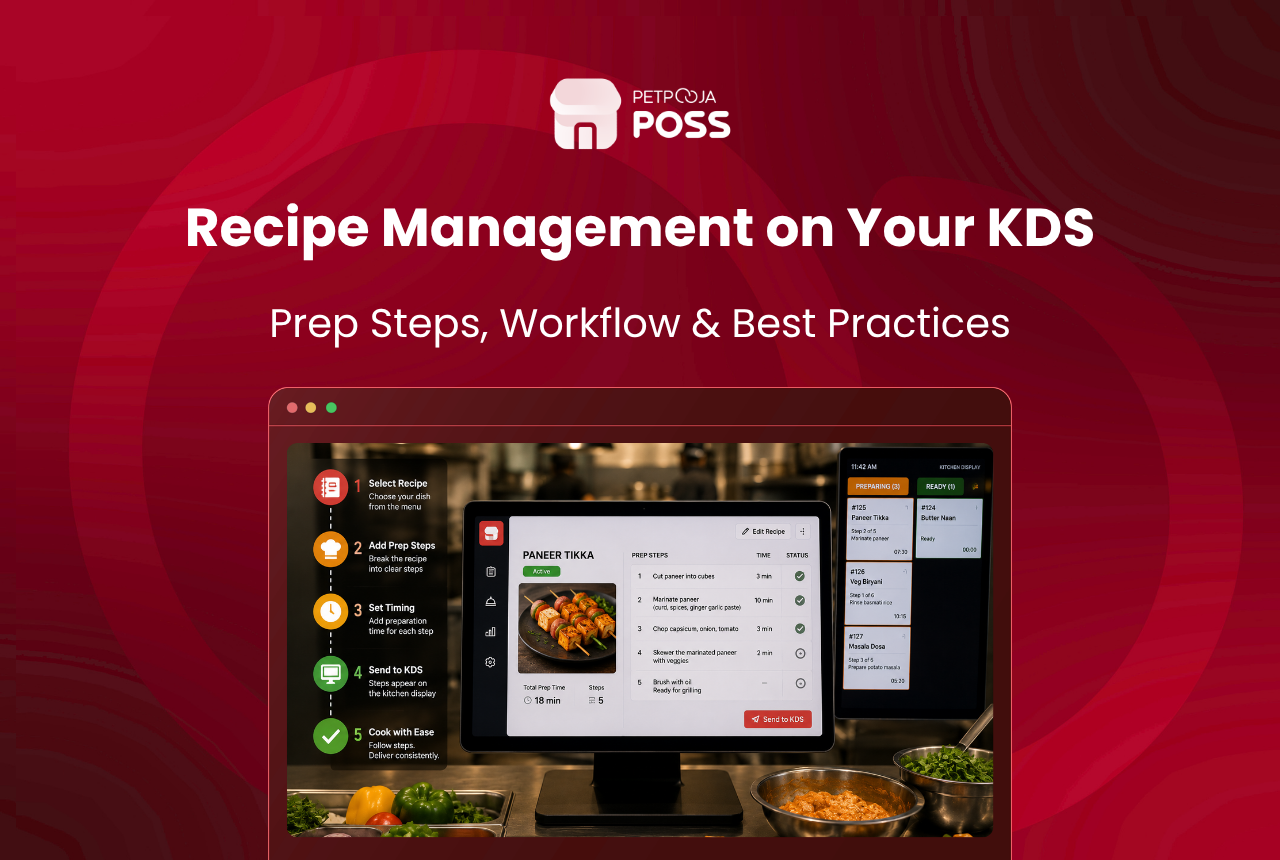
To set up recipe and preparation steps on your kitchen screen, you add the cooking steps to each dish once in Menu Management. From then on, they travel with that item to your kitchen display system. A cook taps the item on the order card, a side panel opens, and the method, portion, and plating notes show right there on the screen.
The point of this is consistency. A paper KOT tells the kitchen what to cook, but never how to cook it. Preparation steps close that gap, so the same paneer tikka leaves the kitchen the same way whether the head chef or a week-old joiner plated it.
This guide walks through the full setup: what you need first, where to add the steps, how they reach the screen, and how to write steps a busy cook can actually follow. You only need the KDS add-on active and your menu items already created.
Key Takeaways
- Preparation steps are cooking instructions that show on the KDS order card, tap to open
- You add them once per dish in Menu Management, not on the screen itself
- Multi-outlet brands can set steps at the head office and push them to every branch
- Good steps are short, ordered, and include portion and plating, not a full paragraph
- They are separate from recipe costing, which tracks raw-material use for food cost
What Are Preparation Steps on a KDS?
Preparation steps are the short cooking instructions attached to a menu item, shown on the kitchen screen when a cook opens that item. They sit on top of the order itself, so the screen tells the kitchen both what to make and how to make it.
On paper, this never worked. A printed slip only had space for the item name, quantity, and a note like “less spicy”. The method lived in the head chef’s memory or on a laminated card taped to the wall. On a KDS, the steps live on the card, so they are in front of the cook at the exact moment the dish is being made.
In effect, this is light recipe management built into the order screen. The dish carries its own method, not just its name, so the kitchen reads how to make it and not only what to make.
Why Set Up Recipe Steps on the Screen?
The clearest gain is training. A new cook can start plating a dish correctly on day one, because the screen carries the method instead of the chef having to explain it mid-rush. That matters most in kitchens with high staff churn, which is most Indian kitchens.
The second gain is fewer wrong dishes. When the portion and plating are written down and visible, a cook is far less likely to over-pour, skip a garnish, or send out a version the brand does not recognise. For a group opening its fourth or fifth outlet, that written standard is what keeps every kitchen honest to the same recipe.
What Do You Need Before You Start?
Two things need to be in place before you add a single step. Get these ready and the rest takes minutes per dish.
- The KDS add-on is active. Preparation steps show on the kitchen display system, which is an add-on available on the Local and Electron POS. If you are still on paper KOTs, our take on KDS vs paper KOT is worth reading first.
- Your menu items exist. Steps attach to an item, so each dish must already be created in your item master. If a dish is not in the menu yet, add it before you write its steps.
It also helps to agree the standard recipe for each dish before you type anything. The setup only records the recipe; deciding the correct one is a kitchen call your head chef should sign off.
How to Set Up Preparation Steps, Step by Step
Here is the flow an order and its steps follow, from where you set them up to where the cook reads them.
1. Open the dish in Menu Management. All the setup happens in Menu Management, the same back office that runs your Petpooja POSS billing, not on the kitchen screen. Find the item you want, for example your signature biryani, and open its settings. This is the same place you manage prices, categories, and online availability, so nothing new to learn.
2. Write the preparation steps for that dish. Add the method as short, ordered lines: the marination, the cook time, the portion, and the plating. Keep each line to one action. A cook reading it mid-rush should scan it in seconds, so this is not the place for a paragraph of prose.
3. Save, and sync to your outlets. Once saved, the steps become part of that item. If you run a single outlet, they are ready. If you run several, push the updated menu from the head office so every branch’s kitchen screen carries the same steps. This head-office control is how a chain keeps one recipe across ten kitchens.
4. Check it on the kitchen screen. Fire a test order or watch the next live one. Tap the item on the KDS card and confirm the steps open in the side panel and read clearly. If a line is unclear on the screen, fix it back in Menu Management. It is worth doing this once with the head chef looking on.
What Makes a Good Preparation Step?
Setting up the feature is the easy part. Writing steps a tired cook can follow at 9pm on a Saturday is the real skill. A few habits make the difference.
| Weak step | Clearer step |
|---|---|
| “Make the biryani properly” | “Layer 1 cup rice, add 120g chicken, seal 4 min” |
| “Add sauce” | “Add 30ml schezwan sauce, toss 20 seconds” |
| “Garnish nicely” | “Top with coriander and 2 fried onion rings” |
Use these as a guide when you write:
- One action per line. Break the recipe into single steps a cook can tick off in their head.
- Put numbers in. Portions, weights, and times remove guesswork and keep food cost steady.
- Note the plating. The last line should describe how the finished dish looks, so it leaves the pass right.
- Flag the non-negotiables. Spice level, allergens, and any step that ruins the dish if skipped.
Safety-related notes belong here too. Writing a holding temperature or a storage reminder into the steps helps your cooks follow the hygiene practices the FSSAI expects every food business to keep, right at the point where the dish is made.
How Do You Keep the Steps Current?
A recipe is not fixed forever. When the head chef changes a marination or the portion shifts to protect margins, update the step in Menu Management once and re-sync. The screen then shows the new version to every cook from the next order.
This is far easier than the paper way, where a recipe change meant reprinting cards and hoping every outlet swapped them. It pairs well with a written restaurant kitchen SOP checklist, so the screen holds the recipe and the checklist holds the routine around it.
How Does This Help in a Busy Kitchen?
As an example, and not a specific client, picture a 3-outlet biryani brand in Vijayawada that grew fast and hired 6 new cooks in one quarter. Before the steps were on screen, each new cook plated the chicken biryani a little differently, and regulars started noticing the portion drift.
The owner spent an afternoon writing preparation steps for the top 20 dishes in Menu Management, then pushed them to all 3 kitchens. From the next service, every cook saw the same layering, the same 120g portion, and the same garnish on the screen. The dish stopped depending on who was on shift. This kind of standardisation is what makes a busy kitchen run without chaos as it adds outlets.
Conclusion
Preparation steps turn your kitchen screen from a list of orders into a working recipe book. You set the method once, and every cook, new or senior, plates the dish the same way for as long as the recipe stands. For a growing brand, that consistency is hard to hold any other way.
If your kitchen already runs a Petpooja POSS KDS, the feature is waiting inside Menu Management. Spend one afternoon on your top-selling dishes, sync them to your outlets, and let the screen carry the recipe so your chef does not have to repeat it every rush.
Frequently Asked Questions
You add them in Menu Management, inside each menu item, not on the screen itself. Once saved, the steps travel with that item to the kitchen display system, and the cook opens them from the order card.
If you run more than one outlet, you can set the steps at the head office and push the menu to every branch. Each kitchen screen then shows the same steps for that dish, which keeps a recipe steady across locations, the same idea behind a smooth kitchen workflow.
No. Preparation steps are the recipe management the kitchen sees, cooking instructions such as method and plating. Recipe costing is a separate inventory job that maps how much raw material a dish uses so you can track food cost, and you can estimate that with a recipe costing calculator.
Yes. Edit the steps for a dish in Menu Management whenever the recipe changes, then save and sync so the update reaches the screen. This is handy for a seasonal item or a changed portion size.
The kitchen screen gets orders and item details from your POS over your local network, so the steps show as long as the POS and screen are connected. You only need the internet to sync menu changes made at the head office. A cloud kitchen SOP checklist helps keep that routine tight.